PAGE CONTENTS
- Introduction
- Guides
Introduction
Backup and recovery of Exchange Mail forms part of our Microsoft 365 service offering. Watch our video below to learn more.
To add a backup set and do a first recovery, you need to be both a RedApp company administrator, and a Microsoft 365 global administrator for your tenant organisation. To do subsequent recoveries, you only need to be a RedApp company administrator and a Microsoft 365 Exchange admin. Read more about Microsoft's admin roles in this article on their knowledge base.
What is supported?
Redstor currently supports the following:
- Archive mailbox backup and recovery
- Calendar backup and recovery
- Contacts backup and recovery
- Export to PST
- Multiple mailbox recovery
- Recover back to Exchange (new folder)
- Shared mailbox backup and recovery
- Single item recovery (Mail, Contacts, Calendar)
What is not supported?
- Group mailboxes
(Note: These are not the same as shared mailboxes, e.g. they do not contain contacts, and the conversations appear as threads. A group mailbox is automatically created whenever a user creates a new Microsoft 365 group in the Microsoft 365 Admin Center. Group mailboxes are not created for groups created in the Entra Admin Center. Read more on Microsoft's knowledge base here.) - Guest users
- Individual EML or MSG files
- Just-in-time (JIT) or "viral" tenants
- Private events in Calendar
- Public contacts
- Public folders
Please also note the following limitations:
- It is not possible to exclude specific file types from backups.
- Data with fidelity is only available via Microsoft Exchange Web Services (EWS).
- Large backups and archive mailbox backups may experience throttling, which results in long backup durations.
- Poor performance is seen on Linux.
- With PST restores, there is a known limitation relating to certain contact fields, including email address. Read more in Article 1574.
Guides
Use the guides below to manage your Exchange backups.
How to add a backup set
To add a backup set, you need to be both a RedApp company administrator, and a Microsoft 365 global administrator for your tenant organisation. Read more about Microsoft's admin roles in this article on their knowledge base.
1. In the RedApp, go to the home page for the customer company you want to add backups for. Click on the search icon at the top right to find a specific customer.

2. To add a new backup set, go to Microsoft 365. If you do not see Microsoft 365 listed, you will need to add it as a product.

3. Click Add at the top right and go to Add backup set.

4. Select Exchange and click Sign in.

5. You will need to sign into Microsoft 365 and provide Redstor with permission to access your data. Click Accept.
Note: If you encounter an "Access denied" error, click here.
6. You can now select accounts for backup. You have two options: include all accounts or select specific accounts.
Include all accounts (faster)
This option creates a backup set that includes all accounts in the tenant.
- You can edit this selection at any time after the setup is complete by following the steps in How to edit a backup set below.
- Enable Include new accounts at the bottom of the page to ensure that future additions to this tenant are automatically added to the backup selection.
- Click Save to proceed.

Select specific accounts (more control)
This option lets you select specific accounts for backup from a list of all accounts in the tenant.
- If you have a large number of accounts, this list may take a few moments to load.
- You can edit this selection at any time after the setup is complete by following the steps in How to edit a backup set below.
- When selecting specific accounts, use the tabs to switch between user-based and group-based selection. It is not possible to select a combination of users and groups.

Note:
- Groups refer to Microsoft Entra groups (previously known as Azure Active Directory security groups), and not to Redstor backup groups as they are known to Storage Platform Console users.
- If you intend to select a large number of users and regularly make changes to the selection, it is easier to use this workaround.
- The Microsoft tenant ID for the specific tenant is shown at the top of the backup selection page for reference.
The Users tab (for user-based selection) will be open by default. Click on the Groups tab to switch to group-based selection.

When you switch from the Users to the Groups tab or vice versa, the new tab will have all accounts selected by default. While you are editing your selection, your choices in both tabs will persist even if you toggle between them. Once you click Save, the selection in the tab that is currently open will be saved, and any selections in the other tab will be discarded.
By default, all users/groups will be selected for backup. To retain this selection and proceed, click Save. In the Users tab, you can also enable Include new accounts to ensure that future additions to this tenant are automatically added to the backup selection.

Alternatively, you can deselect the users/groups you do not want to backup, or deselect all and select only the users/groups you want to backup. Note that it may take a while for all users/groups to load.

In the Groups tab, you can drill down to select only specific subgroups for backup.

You can also use the search field to find a specific user/group.

Once you are satisfied with your selection, click Save and proceed to Step 7 of this guide. If you do not want to create this backup set, click Cancel at the top right.

You will be asked to confirm that you want to discard the backup set. Click Discard.

7. Once you have saved your selection, you will be taken to the home page for the new backup set, showing the relevant M365 tenant ID on the Backup selection card. The backup set name (in this case "Exchange") will appear in the sidebar.
Note: For more on tenant naming, see Article 1643.

To queue a backup immediately, click on the menu icon at the top right and go to Backup.

Once your first backup has completed, you can customise which columns you see in the backups table. To do this, click on the columns icon on the right, next to the search bar.

Select which columns you would like to see, then click Apply.

To view an audit trail of key actions and which users performed them, click on the inspect icon at the top right of the page.

How to edit a backup set
1. On the backup set home page, go to Edit from the Backup selection card.
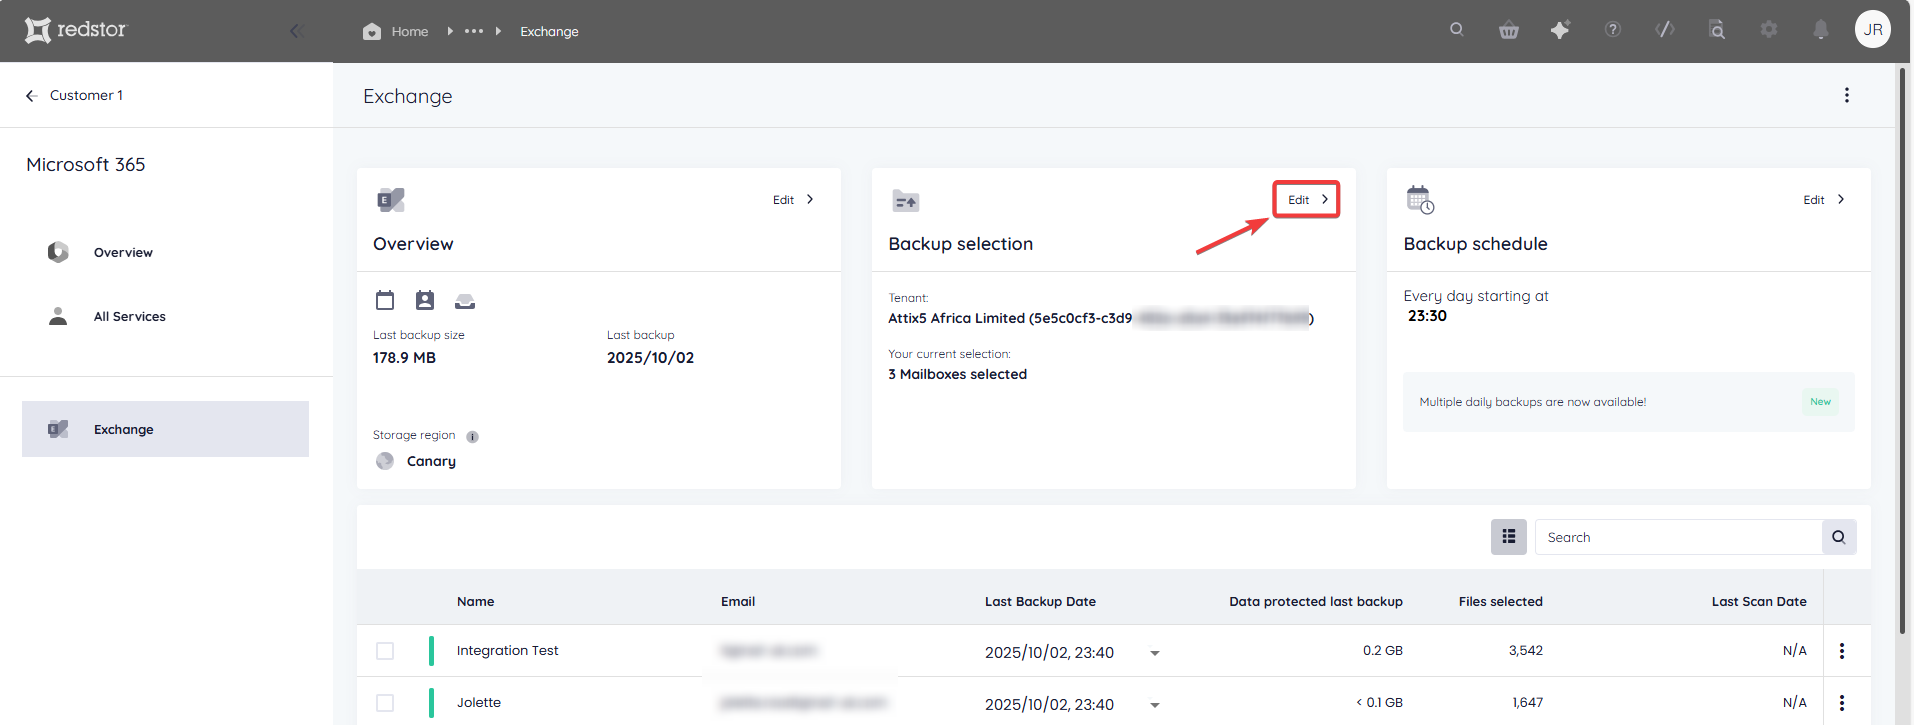
2. Select/deselect the users/groups you want to add/remove and click Save to apply your changes. You can also switch from user-based to group-based selection or vice versa by using the tabs at the top.

When you switch from the Users to the Groups tab or vice versa, the new tab will have all accounts selected by default. While you are editing your selection, your choices in both tabs will persist even if you toggle between them. Once you click Save, the selection in the tab that is currently open will be saved, and any selections in the other tab will be discarded.
If you switch from user-based to group-based selection or vice versa:
- Data from users that were present in the original selection and are present in the new selection will be retained and backups will continue uninterrupted.
- Data from users that were present in the original selection but are not present in the new selection will be retained, but new backups of these users will not be made after the switch. If you switch from user-based to group-based selection, any previously backed-up users that are not in the groups you have now selected will no longer be backed up, but their existing backups will be retained.
- Data from users that were not present in the original selection will only start to be backed up after the switch to the new selection.
You can use the search field to find a specific user or group to add or remove.

To discard your changes, click Go back at the bottom right or Cancel at the top right.

You will be asked to confirm that you want to discard the changes. Click Discard.

The new number of groups/mailboxes selected will now be shown on the Backup selection card.

Note:
- Accounts that have been removed from the backup selection are still retained on the Storage Platform until you permanently delete them using the Storage Platform Console. Read more in Article 1384.
- If you are seeing unlicensed mailboxes being backed up, Article 1586 explains why.
How to add Calendar and Contacts to a backup set
1. On the home page for the backup set, go to Edit on the Overview card.

2. Tick the boxes for Calendar and Contacts and click on the check mark.

Calendar and Contacts will be included from the next backup.
How to configure the backup schedule for a backup set
1. On the home page for the relevant backup set, click on Edit on the Backup schedule card.

2. Select the days on which you would like backups to run, as well as a backup time. You can choose between daily and custom backups.
- For daily backups, select the number of backups per day (1 or 3). In the case of 3 backups per day, the first backup will run at the specified backup time. The second and third backups will run at 8 hours and 16 hours after the specified backup time. For example, if the specified backup time is 02:00, backups will run at 02:00, 10:00, and 18:00.
 Note: Multiple daily backups is only available as part of our M365 Premium edition. If you do not see the option to schedule multiple daily backups, you are on a legacy pricing plan. If you would like to enable multiple daily backups, please speak to your account manager about upgrading.
 - For custom backups, select the days and time that you want your backups to run.

3. Click the check mark at the top right to save your schedule. The Backup schedule card will now show the updated backup time/s.
How to recover a backup set
To do a first recovery, you need to be both a RedApp company administrator, and a Microsoft 365 global administrator for your tenant organisation. To do subsequent recoveries, you only need to be a RedApp company administrator and a Microsoft 365 Exchange admin. Read more about Microsoft's admin roles in this article on their knowledge base.
Note: Mail, Contacts and Calendar items are recovered with all the original metadata.
Watch our video for an overview of your recovery options, or follow the steps below.
1. Select data for recovery
In all cases, you will need to select the mailbox/es or item/s you want to recover, as well as the backup (date) you want to recover from.
There are different ways you can select data for recovery.
If you want to recover a specific mailbox, use the Search function to find it.

Under Last Backup Date, select the backup you want to recover from.

Click on the mailbox's menu icon on the right and go to Recover to see your options.
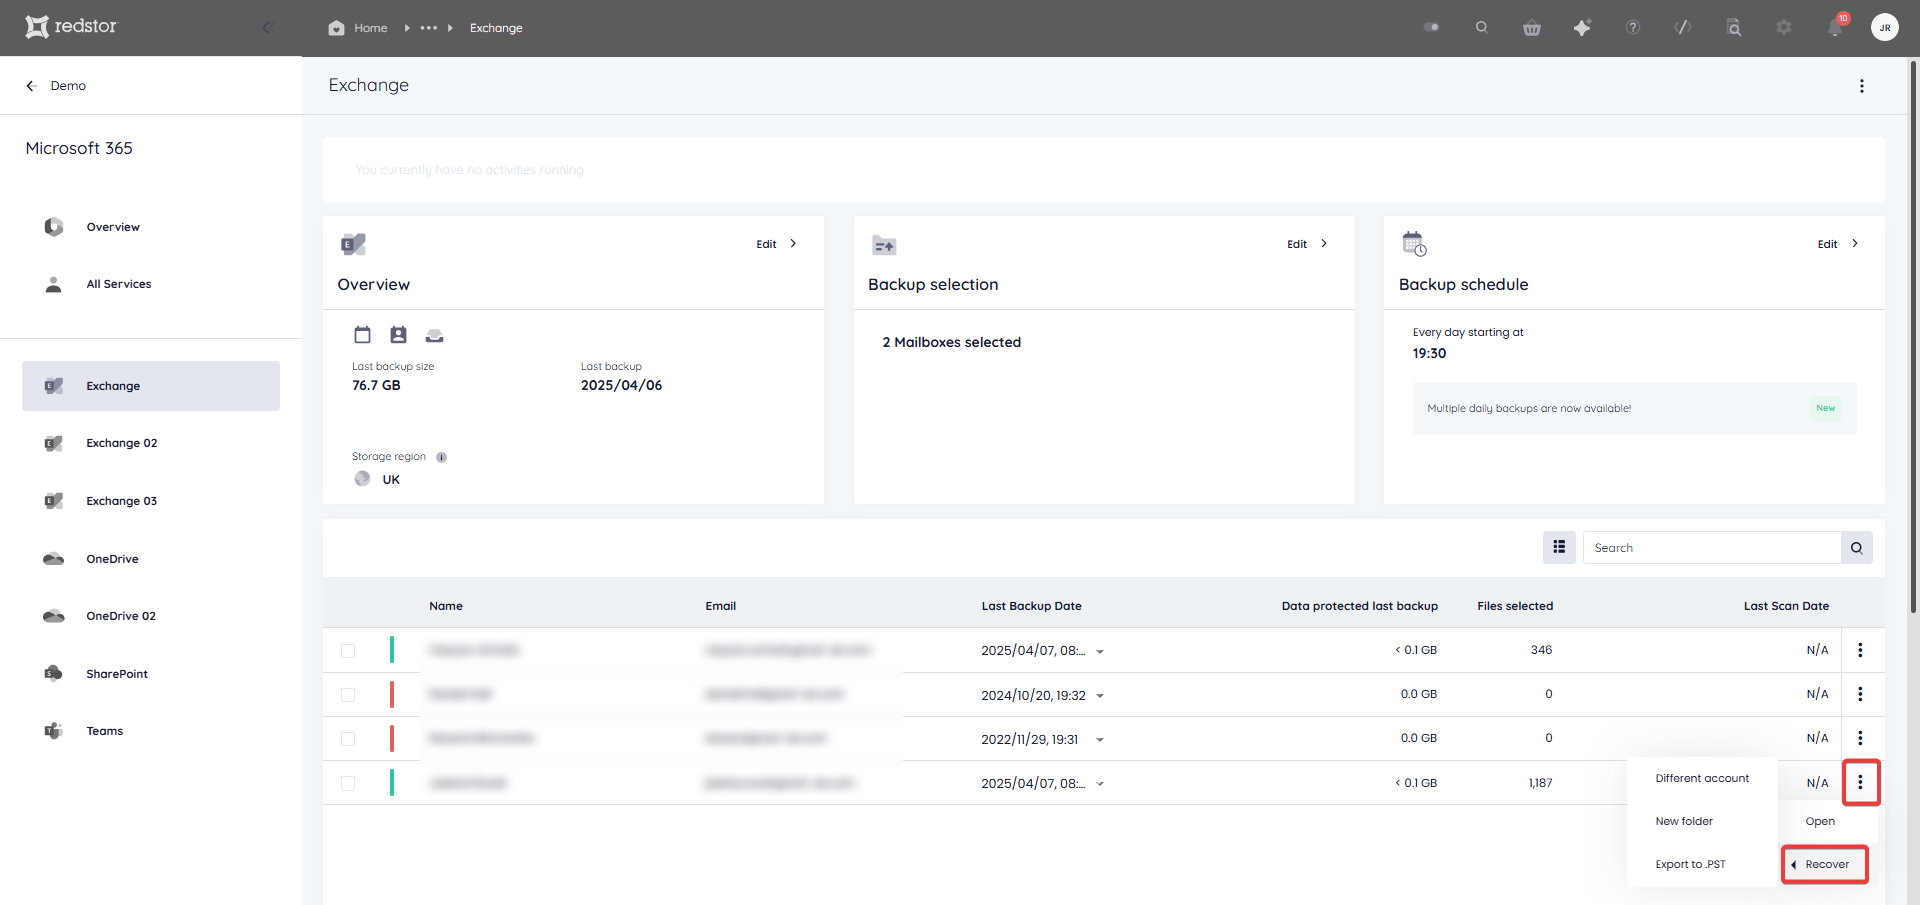
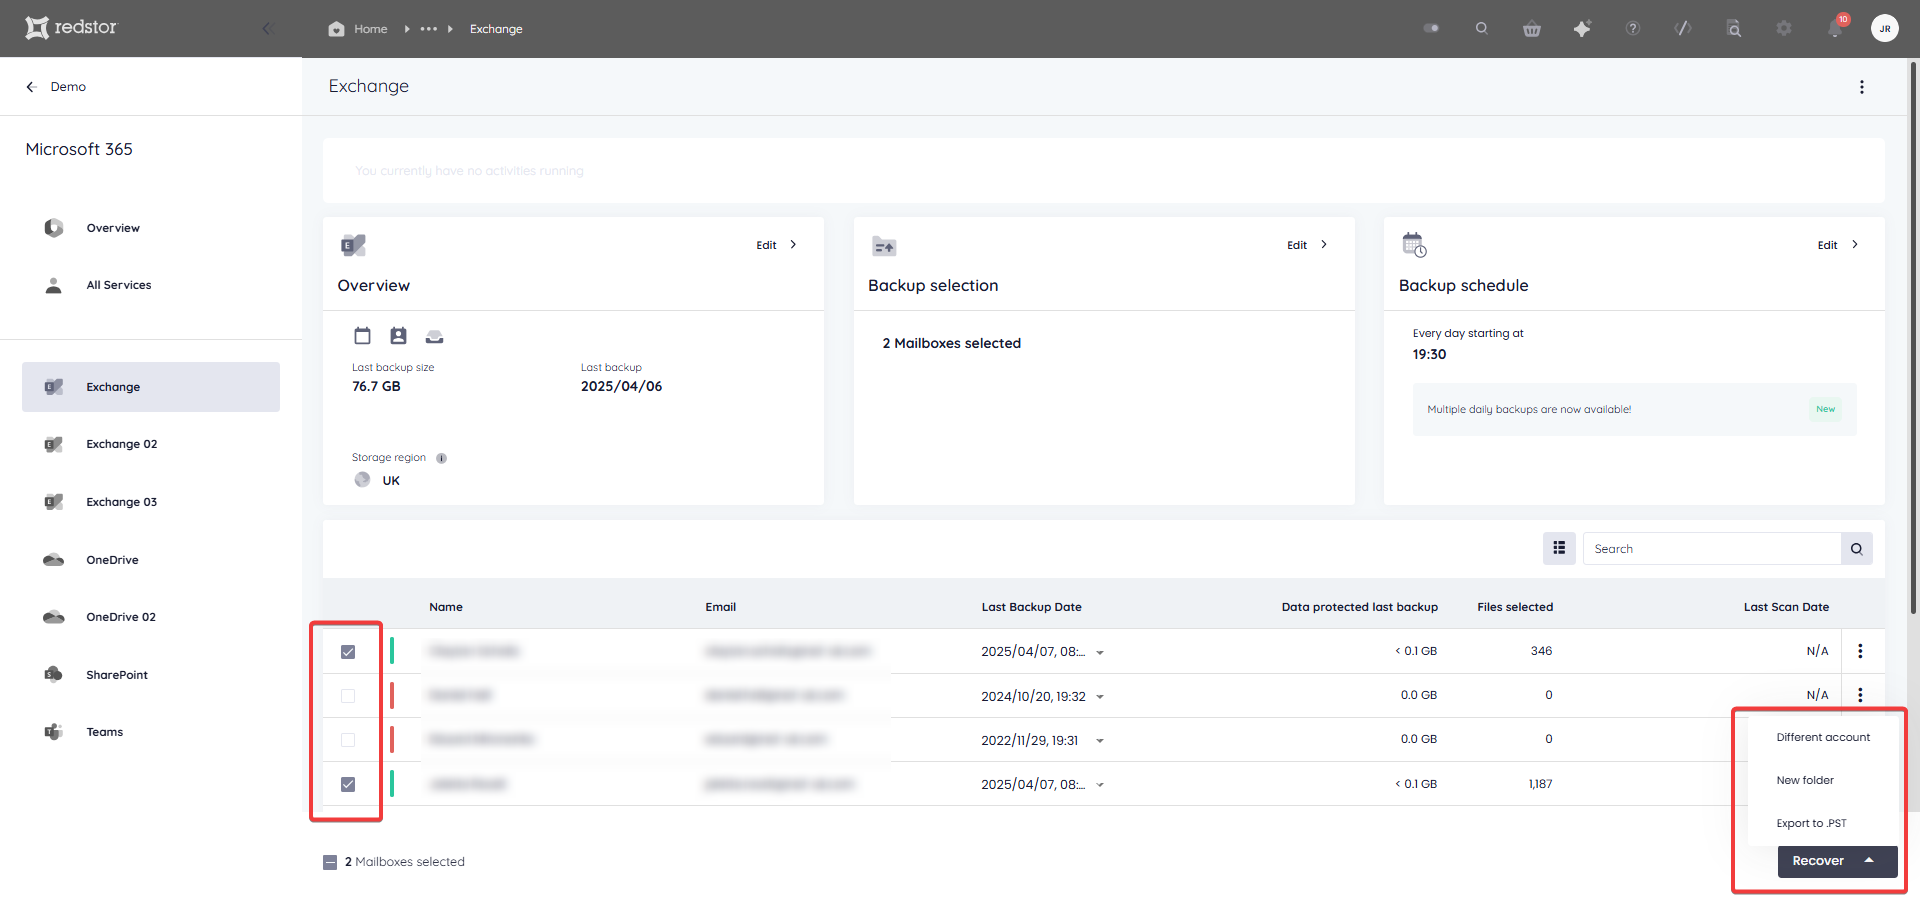
If you want to recover all data for multiple mailboxes, select the mailboxes and then select a backup date for each. You can select different backup dates for different mailboxes.
Note: If you need to recover multiple mailboxes, it is advised to recover them in bulk (all at once) and not in sequence (one after the other). It is not possible to queue a recovery while another recovery for the same backup set is in progress.
If you only want to recover one or more individual items from a mailbox, click on the mailbox name to expand its contents. Alternatively, click on the menu icon on the right and go to Open.
Drill down into the mailbox contents and select what you want to recover. When you are ready, click Recover.
For more on recovering Calendar events and Contacts, see Article 1590.

You can also use the Search field to find a specific item to recover. Select the item/s for recovery and click Recover.

2. Select the recovery method
Next, you will need to choose how you want to recover your selected data.
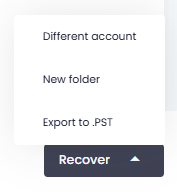
- Different account recovers the data to a new folder named Redstor Restores in the target mailbox, which you can find in Outlook by expanding the Folder Pane on the left. The structure will be Redstor Restores > (timestamp folder) > Mailbox > (source folder of recovered item).
- New folder recovers the mailbox's data to a new folder named Redstor Restores in the original mailbox, which you can find in Outlook by expanding the Folder Pane on the left. The structure will be Redstor Restores > (timestamp folder) > Mailbox > (source folder of recovered item).
- Export to .PST generates an Outlook Data File (.pst file) which can be imported into Outlook.
3. Proceed with recovery
After choosing a recovery method, you will need to authenticate with your RedApp user through a one-time pin.

You will also need to authenticate with an appropriate Microsoft 365 user (global admin for first recovery, global or Exchange admin for subsequent recoveries).

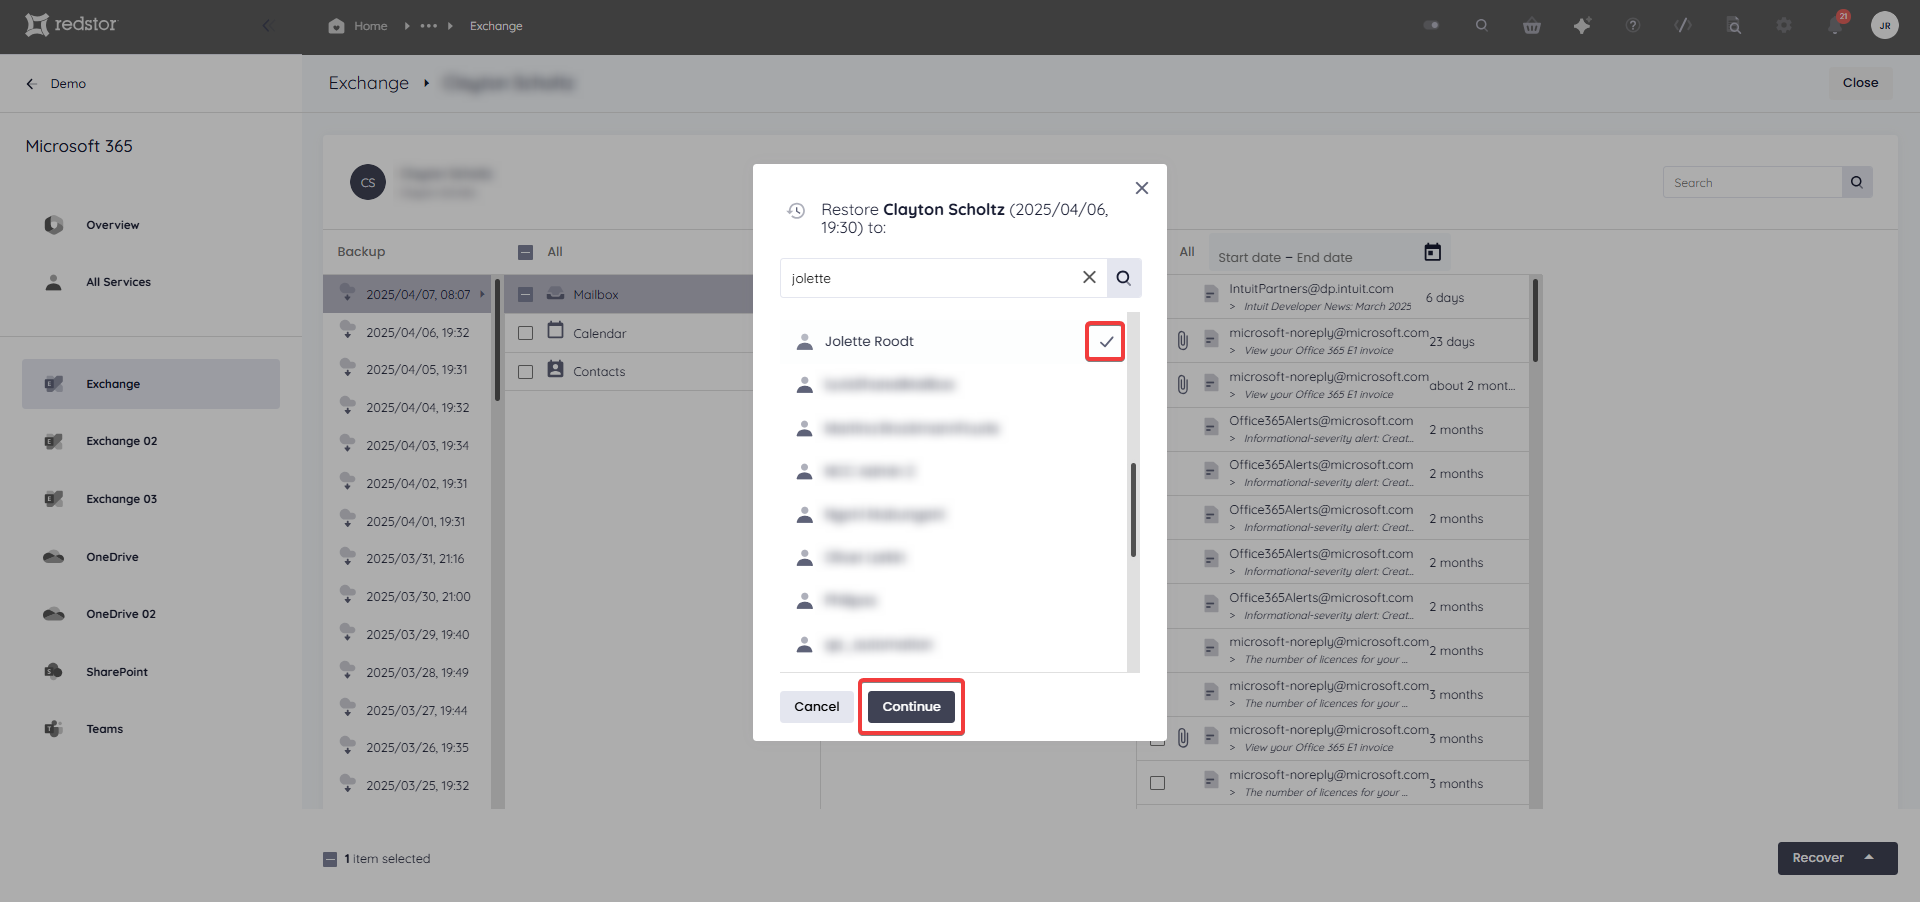
If you selected Different account, follow these steps:
- Scroll down or search and select an account to recover to, then click Continue. Note that the target account must be in the same backup set as the source account.
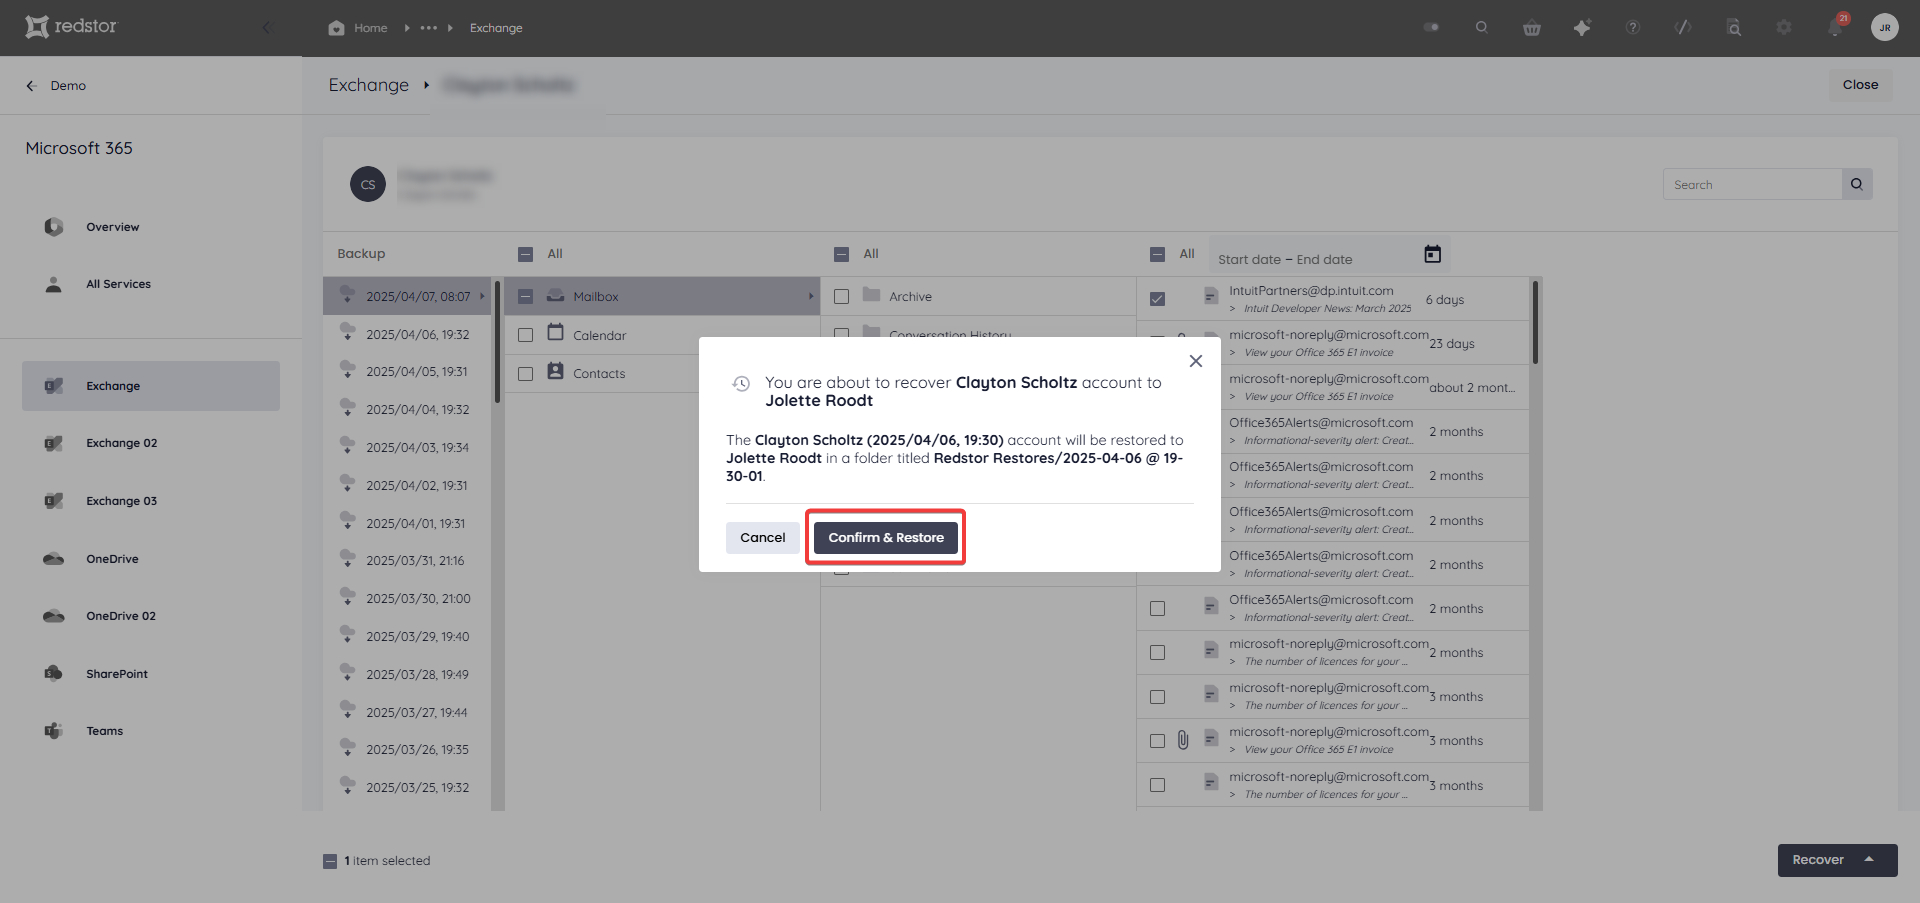
- Check the details and click Confirm & Restore.
If you selected New folder, you will not need to complete further steps. You will see a series of notifications at the bottom of the page to show that the restore has been initiated. A progress bar will also appear at the top of the page.
If you selected Export to .pst, the RedApp admin user who initiated the restore will receive an email containing a download link to the exported Outlook Data File. This file can then be downloaded and imported into the relevant Outlook instance by going to File > Open & Export > Open Outlook Data File. Note that downloaded PST files will be smaller in size than the corresponding backups reported in the RedApp. Read more in Article 1547. For more on PST imports, see this Microsoft article.
The selected mailbox/es will receive a notification email to say they are being restored.
How to delete a backup set
Note: This will delete all backed-up data for this backup set. This can only be undone within the first 336 hours (approximately 14 days) after deletion. To request an undelete, please log a ticket with our support team.
1. On the home page for the backup set, click on the menu icon at the top right and go to Remove.

2. Confirm the deletion by clicking Remove.
If you need to cancel the deletion, close the dialog box.
3. Authenticate with your RedApp user to proceed with the deletion.

How to change a backup set's name
1. On the home page for the relevant backup set, click on the menu icon at the top right and go to Rename.
2. Enter the new name for the backup set and click Update. To cancel, close the dialog box.

Was this article helpful?
That’s Great!
Thank you for your feedback
Sorry! We couldn't be helpful
Thank you for your feedback
Feedback sent
We appreciate your effort and will try to fix the article

