PAGE CONTENTS
- Introduction
- What is supported?
- How to add a tenant
- How to view object attributes
- How to recover
- Limitations of Entra ID object recovery
Introduction
Backing up and restoring Entra ID (formerly Azure Active Directory) forms part of our Microsoft service offering. To add a tenant and recover data, you need to be both a RedApp partner adminstrator or company administrator, and an Entra ID global administrator for your tenant organisation.
The retention period for all Entra ID data is 7 years (84 months) with no roll-ups. Retention settings for Entra ID cannot be customised either from the RedApp or the Storage Platform Console.
- For more information, see Article 1573 - Entra ID backup and recovery: frequently asked questions.
- Read more about Entra ID roles in this article on Microsoft's knowledge base.
- Microsoft's best practices for recoverability of Entra ID are documented here.
What is supported?
Redstor supports backup and recovery of the following objects. Click through to see supported attributes and relationships.
- Admin units
- App registrations
- Authentication method policies
- Conditional Access policies
- Enterprise applications
- Groups
- Intune app protection policies
- Intune device compliance policies
- Intune device configuration policies
- Registration campaigns (authentication method)
- Roles
- Users
How to add a tenant
To add a tenant, you need to be both a RedApp partner adminstrator or company administrator, and an Entra ID global administrator for your tenant organisation.
1. In the RedApp, go to the home page for the customer company you want to add backups for. Click on the search icon at the top right to find a specific customer.

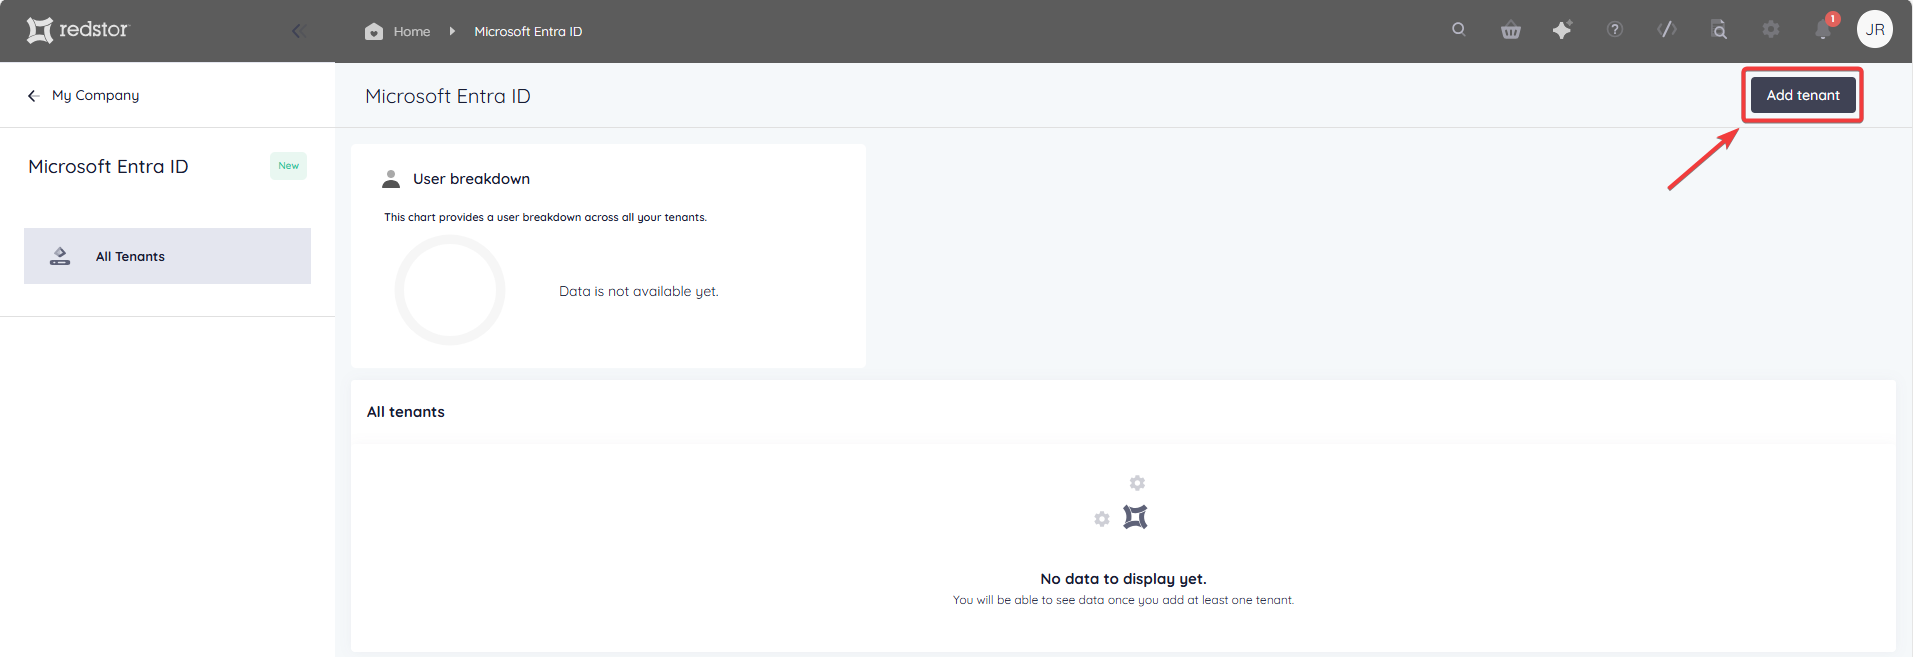
2. To add a new backup set, go to Entra ID in the sidebar on the left. If you do not see Entra ID listed, you will need to add it as a product.

3. Click Add tenant at the top right.
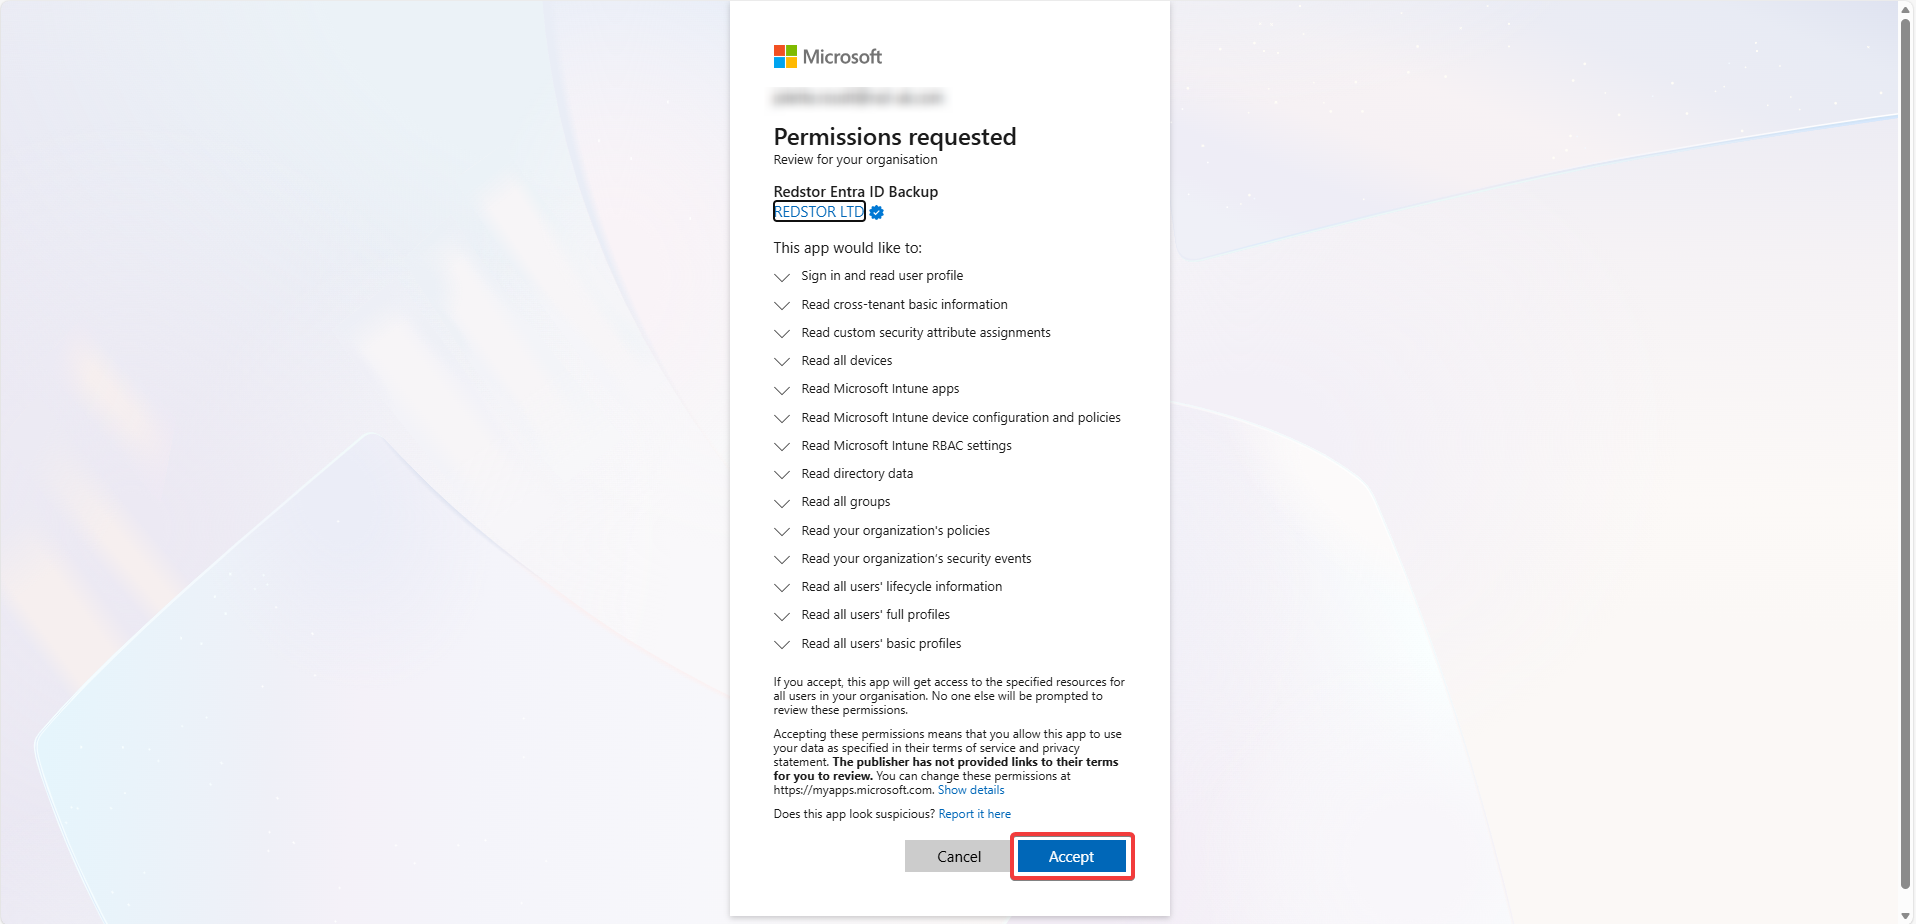
4. Click Sign in. You will now need to sign into Microsoft and provide Redstor with permission to access your data for backup. This action requires a global administrator role.
Note: The authentication screen will pop up in a separate window. If you do not see it, you may have a pop-up blocker enabled. To proceed, allow the pop-up and reattempt the authentication.

By switching on the toggle, you can schedule your first backup to start immediately once the tenant has been added. The time the first backup starts will become the scheduled time for the daily backup of this tenant. This cannot be changed later, but the number of backups per day can be increased up to three.
5. Click Accept to proceed.
6. Your tenant will now appear in the tenants table and in the sidebar. You can run a manual backup of a tenant at any time by expanding the menu in the last column and clicking Backup. To drill down into a tenant, click on its name in the sidebar.

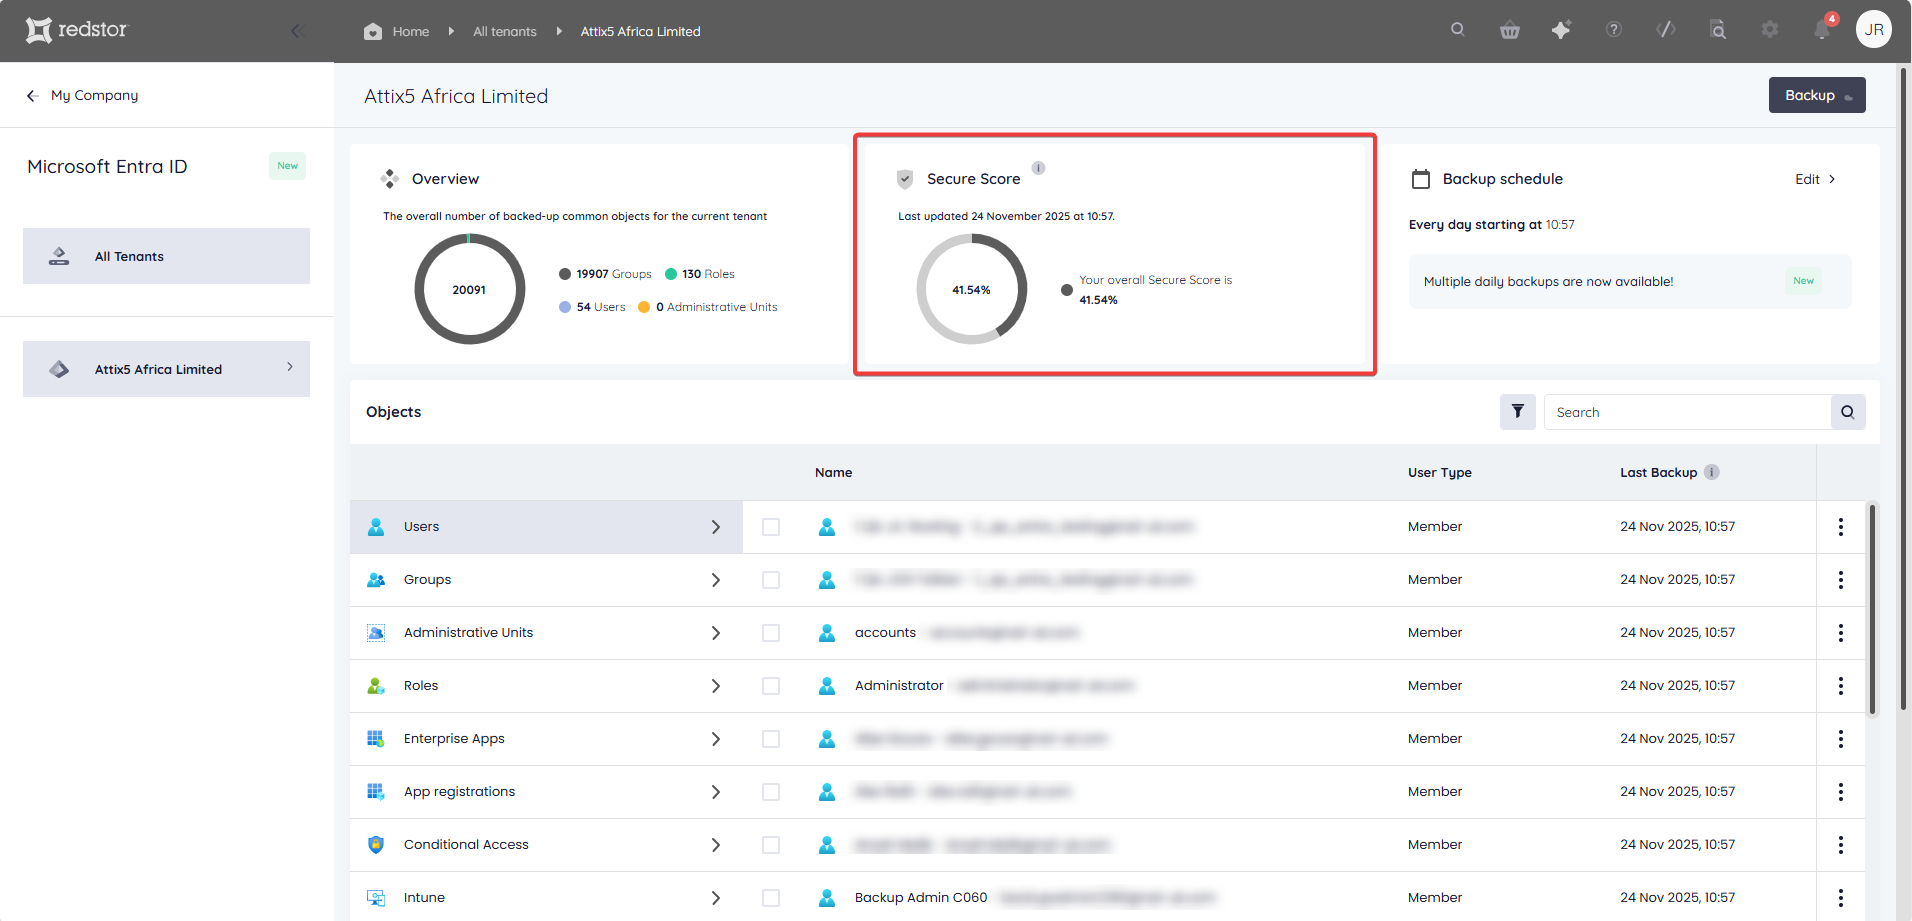
7. On the tenant home page, you will see a list of protected objects once the first backup has completed. The Last Backup column shows the most recent date and time that a distinct version of an object was backed up. This can differ for each object based on the latest changes to it that were included in a backup. Users that have been deleted in Entra ID will be greyed out.

For assistance with estimating the number of billable users your tenant will have, see Article 1437 - Seat management: key terms.
The retention period for all Entra ID data is 7 years (84 months) with no roll-ups. Retention settings for Entra ID cannot be customised either from the RedApp or the Storage Platform Console.
At the top of the page, you will see a Secure Score for the tenant. This is a representation of the organisation’s overall security posture, as calculated by Microsoft (not by Redstor). More detail can be found in this article from Microsoft's knowledge base. This Secure Score should not be confused with the identity secure score in Entra ID.
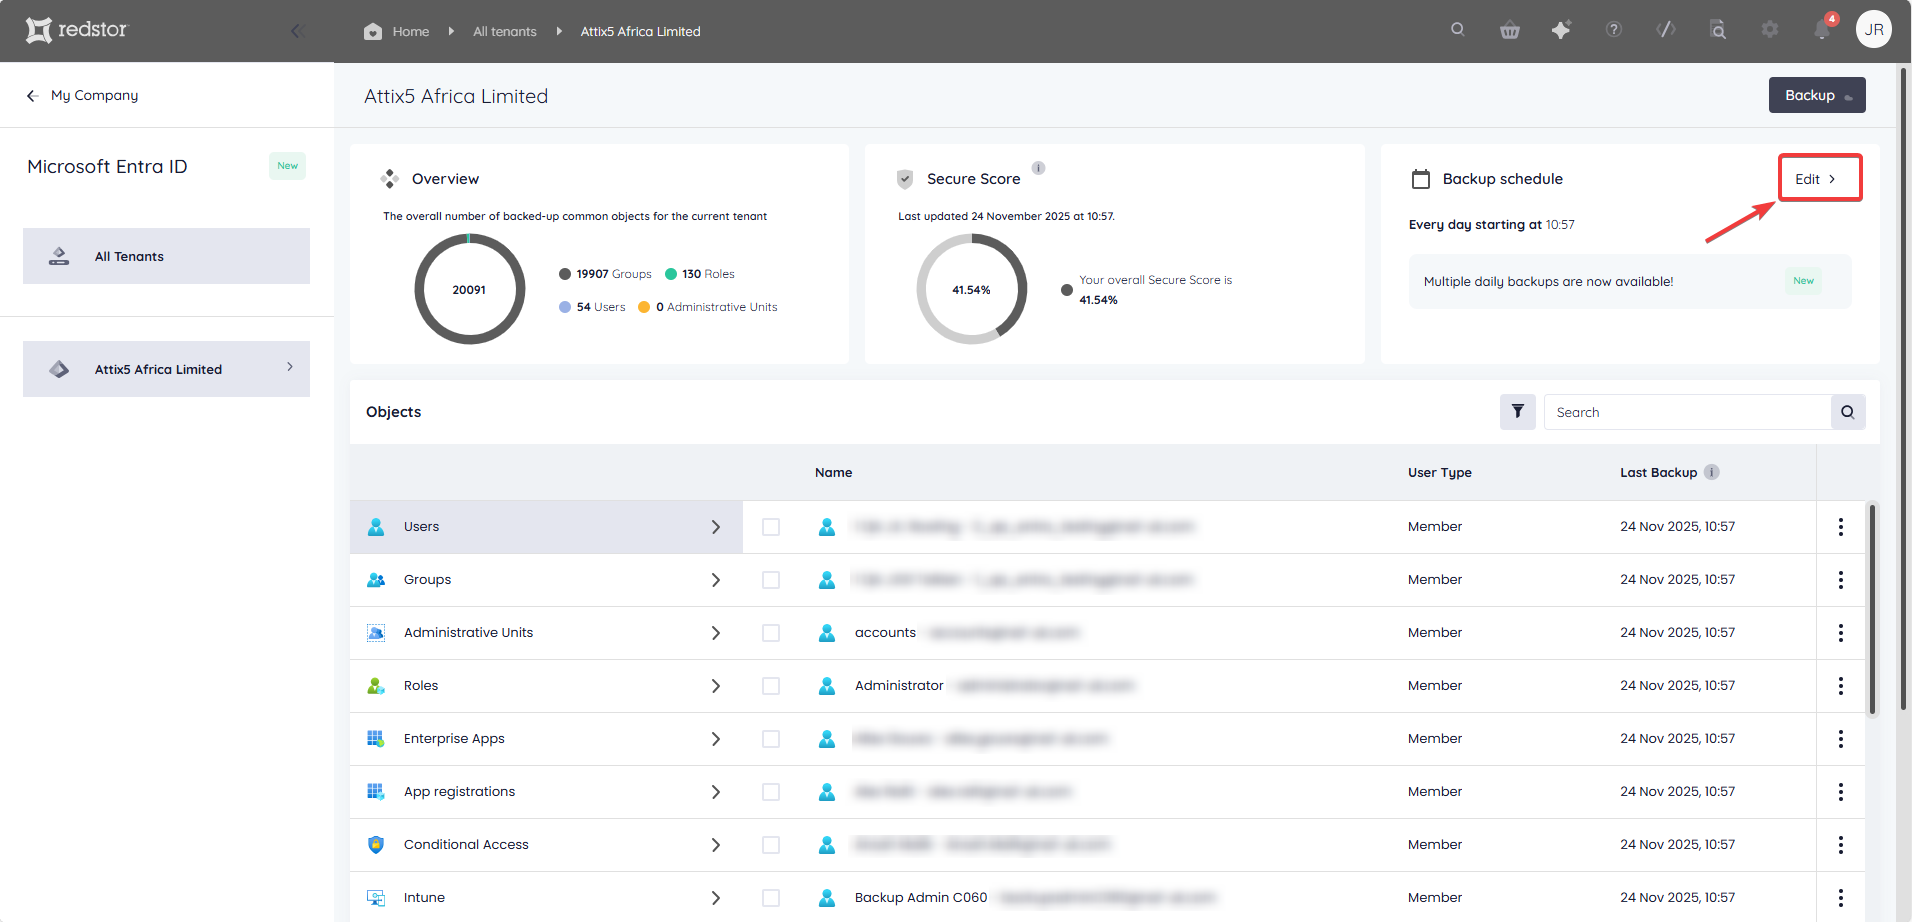
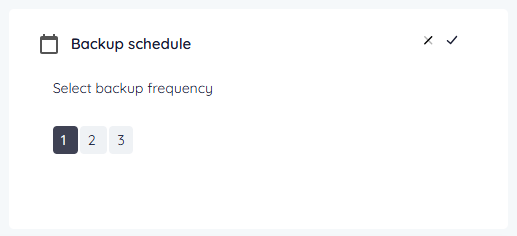
You can make changes to the number of backups per day by going to Backup schedule > Edit.
How to view object attributes
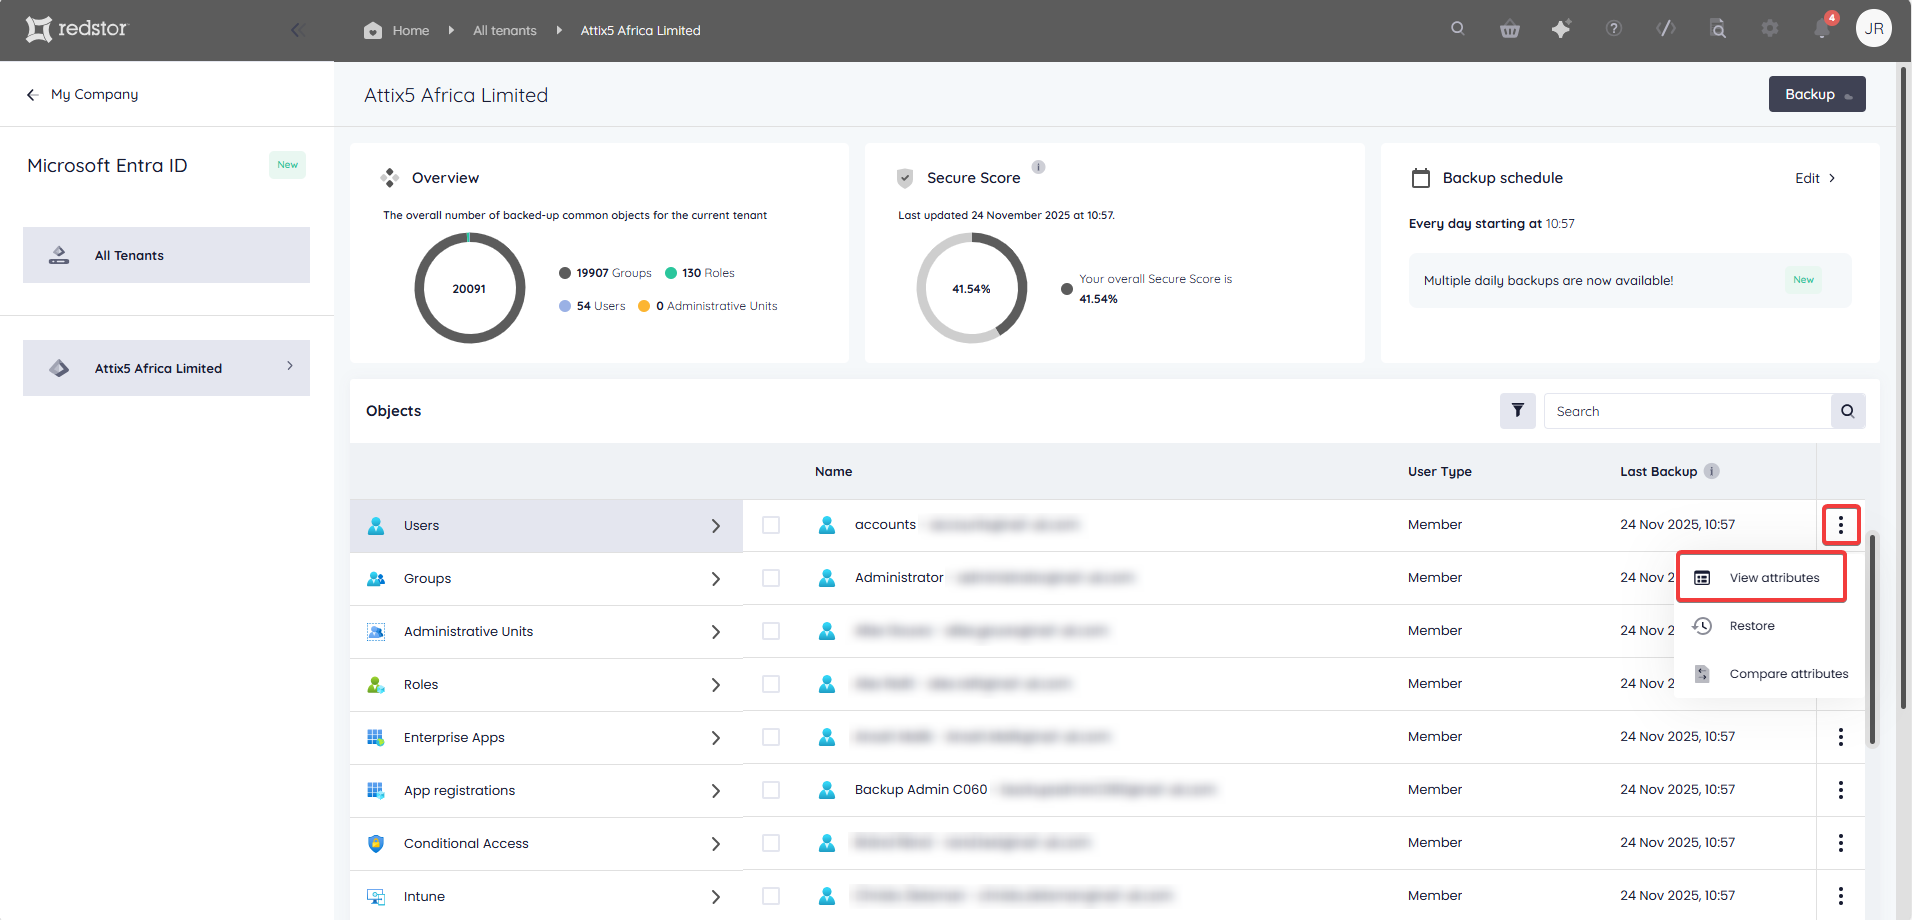
You can view the attributes of the latest backed-up version of any object by expanding the menu to the object's right and clicking on View attributes.
Viewing attributes for users requires authenticating with a directory reader role in Entra ID, but groups and other object attributes do not require authentication. After authenticating, you will be able to view attributes without re-authentication for 7 days.
Note: The authentication screen will pop up in a separate window. If you do not see it, you may have a pop-up blocker enabled. To proceed, allow the pop-up and reattempt the authentication.
You have two ways of viewing an object's attributes: as metadata and as JSON.


When viewing as metadata, you can search for a specific attribute using the search field at the top left of the dialog.

When viewing as JSON, the JSON values can be copied by clicking on the copy icon at the top right of the dialog.

How to recover
Note:
- To recover data, you need to be both a RedApp partner adminstrator or company administrator, and an Entra ID global administrator for your tenant organisation.
- For important information about recovering Entra ID objects, see Limitations of Entra ID object recovery below.
- There are two settings available when restoring Entra ID relationships:restore relationships and restore sub-objects. Read more in Article 1612.
- The process to recover a global administrator will include additional steps to those documented here, and requires assistance from Redstor Support.
1. In your list of protected objects, locate the object you want to recover. Switch between different types of objects in the first column of the Objects table on the tenant home page.

For this example, we will recover a user.
- If you want to recover the latest backed-up version of the user, expand the menu on the right and click Restore.
 A list of restorable versions will be shown, from which you must select one. Restoring will overwrite the user's existing configuration in Entra ID.
 - If you want to recover an earlier version of the user, expand the menu on the right and click Compare attributes. This can assist you in deciding which version to restore.

Select any two versions and click Compare.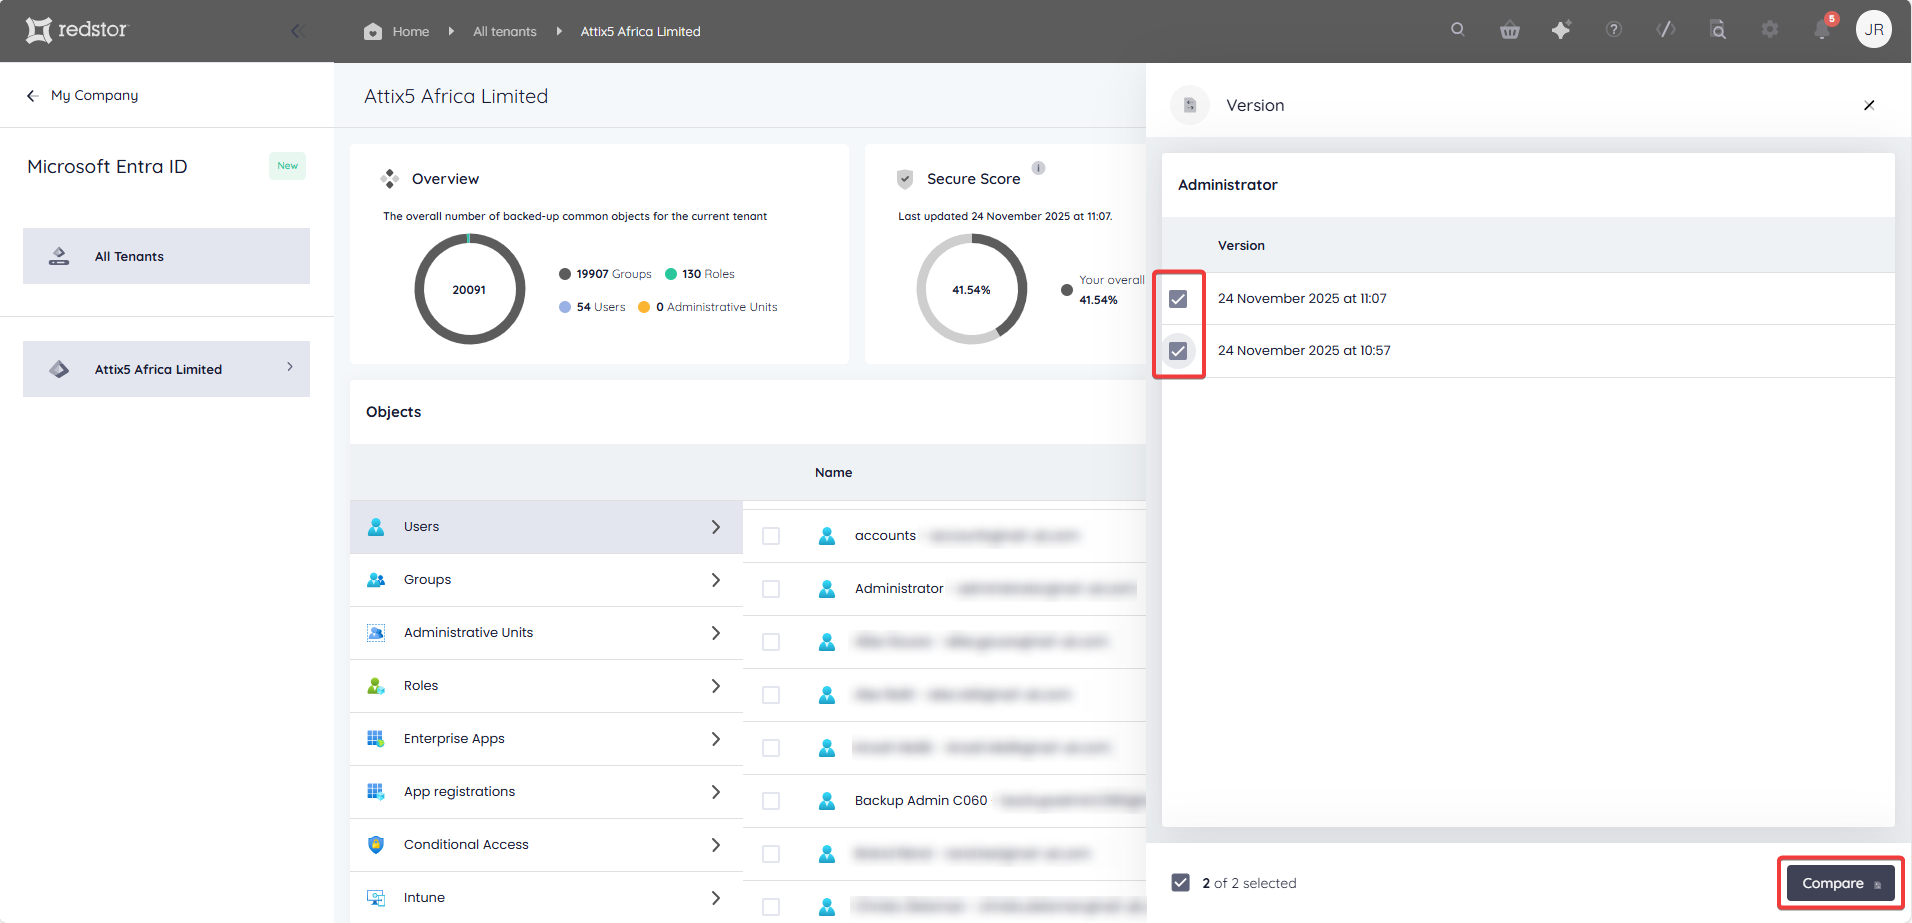
The attributes of the two versions will be shown side by side. To simplify comparison, the option Show only differences will be enabled by default. If there are no differences between the two versions, you will see an empty state. Click Restore to recover one of the versions you selected, or go back to compare other versions.
You can also select multiple objects to recover. Once you click Restore, you will be shown a calendar of possible restore points that include all your selected objects.


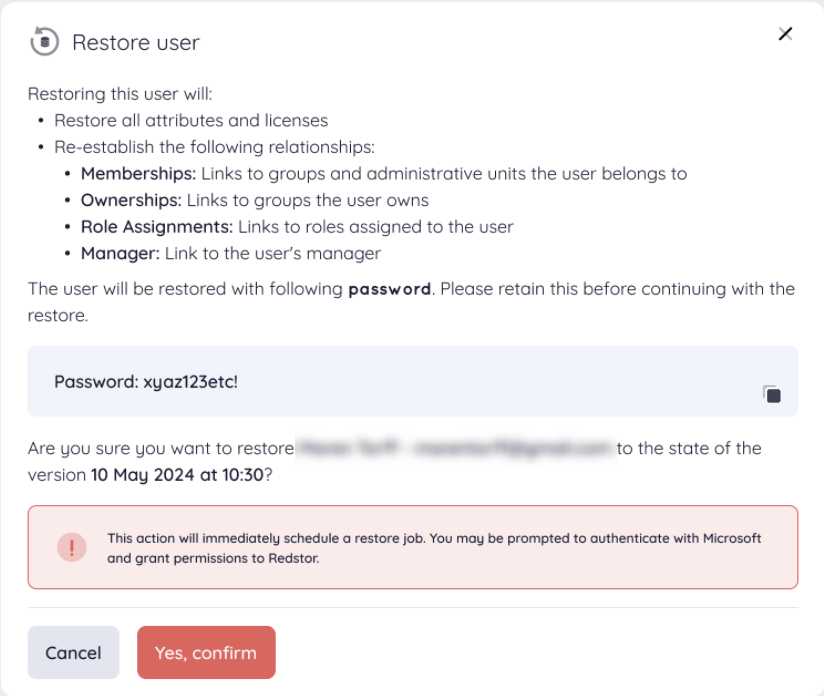
2. Click Confirm & restore to proceed.

You will need to authenticate with a Microsoft global administrator role if this is the first time that you are recovering during the current session. After authenticating, you will be able to do recoveries for one hour without re-authentication.
Note: The authentication screen will pop up in a separate window. If you do not see it, you may have a pop-up blocker enabled. To proceed, allow the pop-up and reattempt the authentication.
Restoring will overwrite the object's existing configuration in Entra ID.
If a user that was deleted in Entra ID is being restored (i.e. recreated), a password will be displayed in the restore warning dialog. This password is a random default that differs for every user, and should be copied as it will not be accessible elsewhere.
Limitations of Entra ID object recovery
- Whenever you recover Entra ID objects in the RedApp, you may be asked to re-authenticate with Microsoft.
- If a group without an owner is deleted, the group can be recovered from the Entra ID admin centre, but not from the RedApp, unless you select a restore point at which the group had an owner assigned to it.
- If a global administrator user is soft-deleted, the user can be recovered from the Entra ID admin centre, but not from the RedApp.
- If a user with a user principal name that matches another active user is soft-deleted, the user can be recovered from the Entra ID admin centre, but not from the RedApp.
- Some objects in Entra (specifically users, groups and admin units) can be either soft-deleted or hard-deleted. All other objects can only be hard-deleted.
- Recovering a soft deletion entails taking the same deleted object out of the Recycle Bin and returning it to its original location.
- Recovering a hard deletion entails creating a new object (a copy of the object from before deletion) and substituting this for the deleted object in the original location. In the RedApp, the original object will be greyed out and shown as deleted alongside the new object with the same name. Restored hard-deleted objects will have a new ID and creation time. Read more on Microsoft's knowledge base here.
- With regard to relationships, we backup and recover only the supported relationships listed here.
- Recovery is not supported for mail-enabled security groups and mail distribution groups.
- Dynamic groups are backed up, but cannot be recovered.
Was this article helpful?
That’s Great!
Thank you for your feedback
Sorry! We couldn't be helpful
Thank you for your feedback
Feedback sent
We appreciate your effort and will try to fix the article