Once you have received your Group Certificate file (.crt) back from Redstor, follow the steps below to upload it to the Storage Platform. If you have not yet requested a a Group Certificate, see Article 009.
1. Navigate to the certificates folder on the machine running the Console. The default location is
C:\Users\[user]\AppData\Roaming\Redstor Backup Pro\Console\Certificates
but the directory may differ depending on your operating system. The Certificates folder contains subfolders for each Collection and Group on the Storage Platform, e.g.
C:\Users\[user]\AppData\Roaming\Redstor Backup Pro\Console\Certificates\DemoCollection\UK\Laptops
2. Paste the groupcertsigned.crt file into the relevant Group folder.
Note: If the filename has the format groupname-groupcertsigned.crt, first rename it to groupcertsigned.crt.
3. Next, open the Account Management view in the Storage Platform Console.
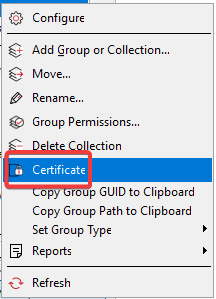
4. Right-click the applicable Group name and go to Certificate.
5. Click on Upload Group Certificate.
Note:
- An Account user’s encryption key is captured when the Account performs a successful backup following the upload of the Group Certificate. It is not possible to capture the encryption key of an Account retrospectively. The Group Certificate must be in place and the account must have completed a backup for the key to be captured. See also Article 1148.
- If your Console connects to a DNS other than sp.pro.redstor.com, this must reflect in the paths above. e.g. zasp.pro.redstor.com, issp.pro.redstor.com.
Was this article helpful?
That’s Great!
Thank you for your feedback
Sorry! We couldn't be helpful
Thank you for your feedback
Feedback sent
We appreciate your effort and will try to fix the article